


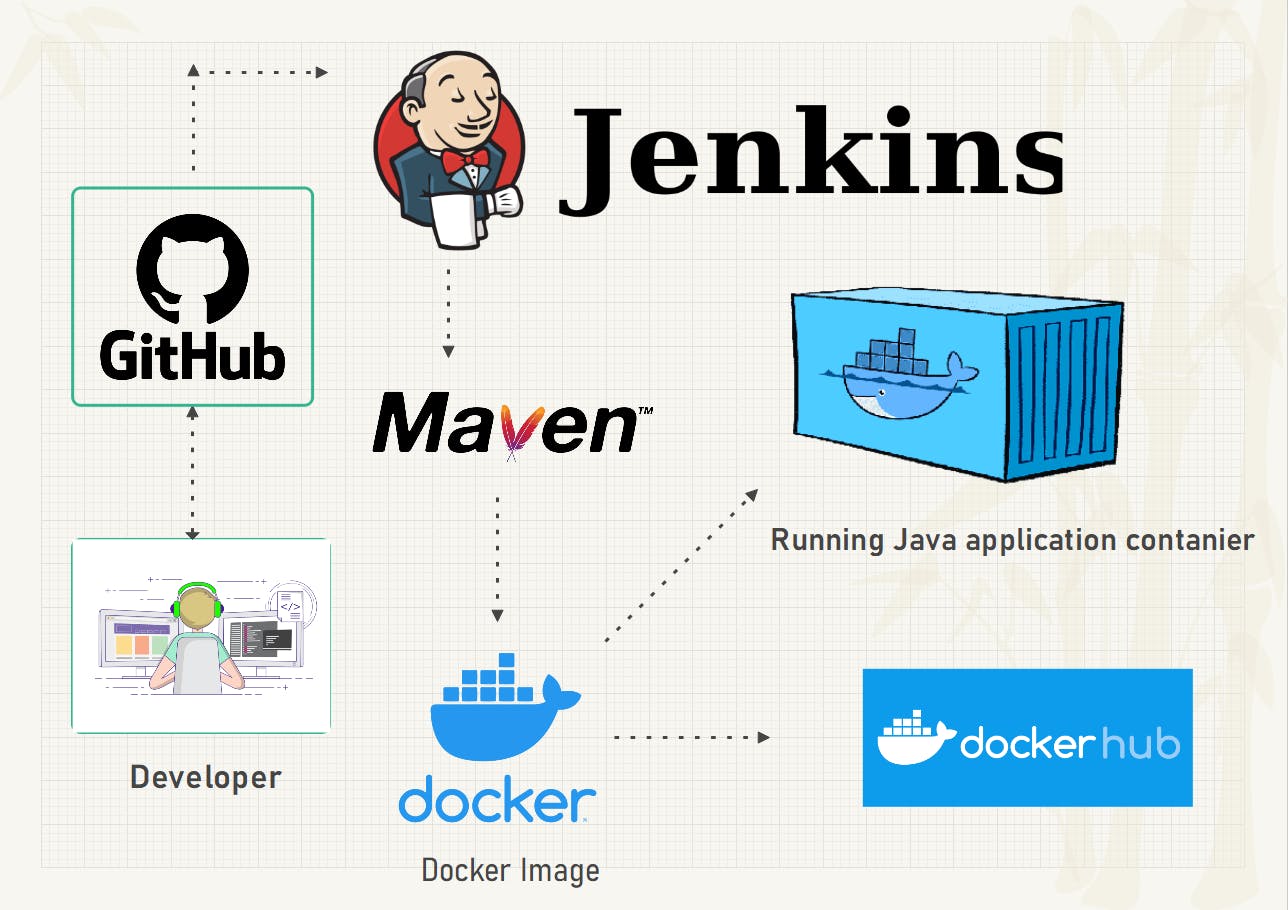
What we will be doing in this article?
Building a Jenkins CI/CD pipeline.
Building Java web application using Maven
Writing the Dockerfile.
Creating the Docker image of the Dockerfile.
Pushing the image to Docker-Hub.
Deploying the Java web application (.War file)
Prerequisite:
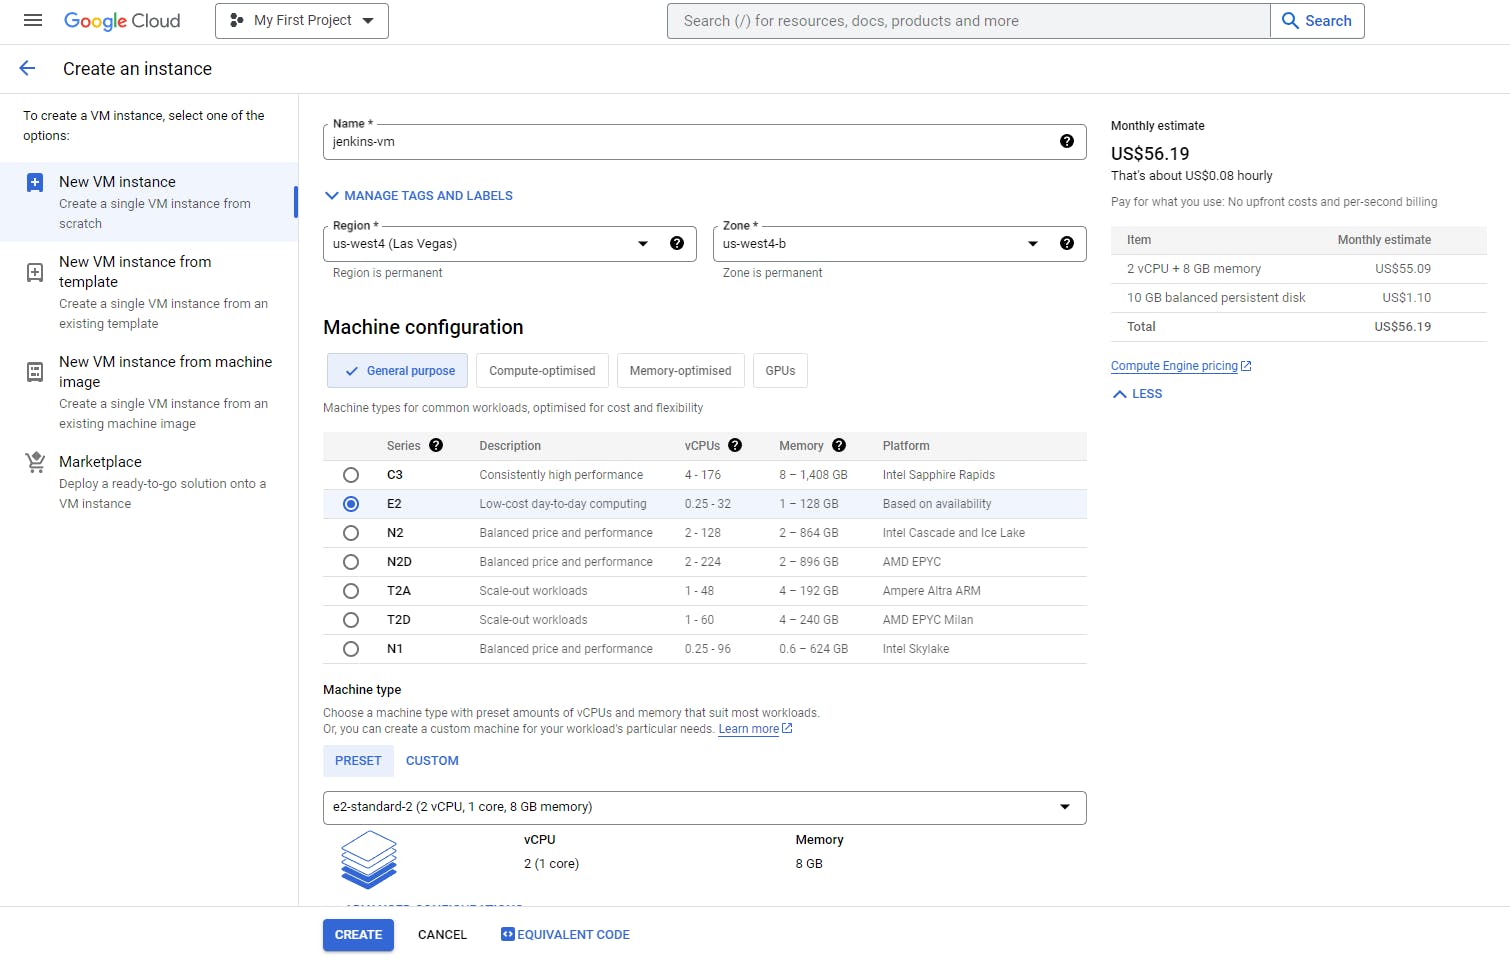
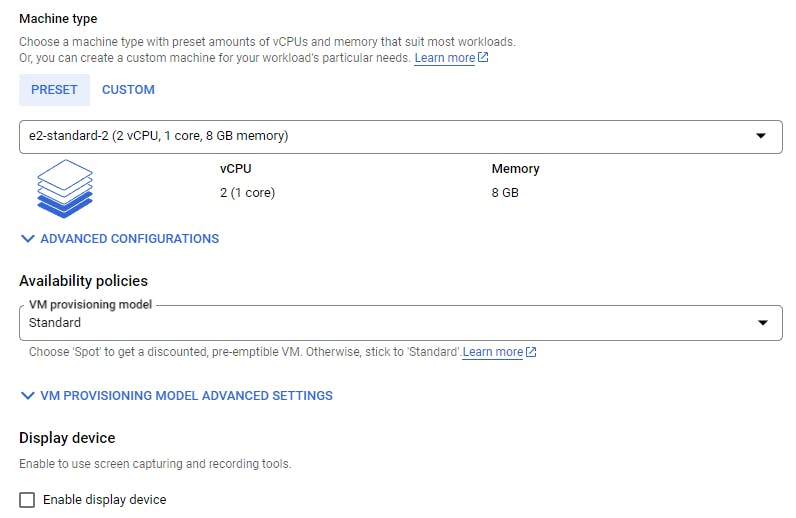
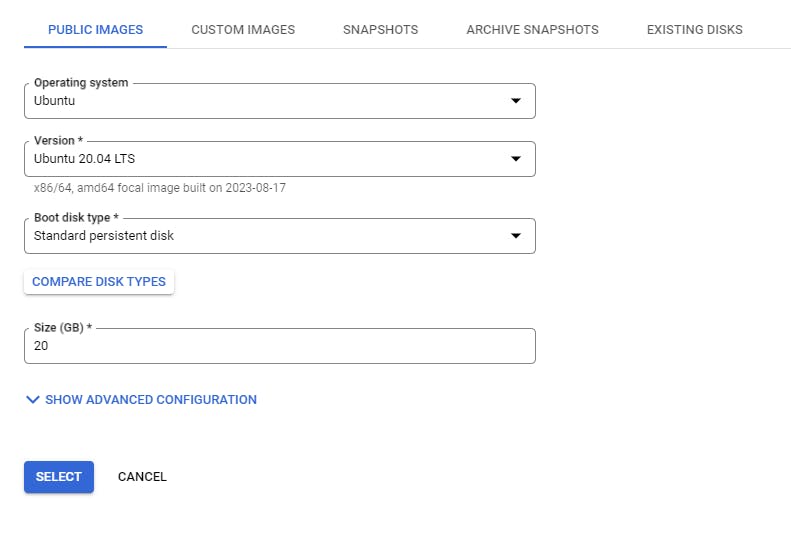
A virtual machine hosted on any platform preferably Google Cloud Platform with the following configuration will make it easy for the application to run. (Create the free Google account to follow without any hesitation it gives you $300 free credit)
A GitHub repository with the code required to create an application out of it, You can use the repository https://github.com/Thant998/OnlineBookStore.git. Here the application code is taken from this https://github.com/Thant998 developer, thanks for him to provide code on GitHub for anyone to use. Copy these files into your repository and make them private.
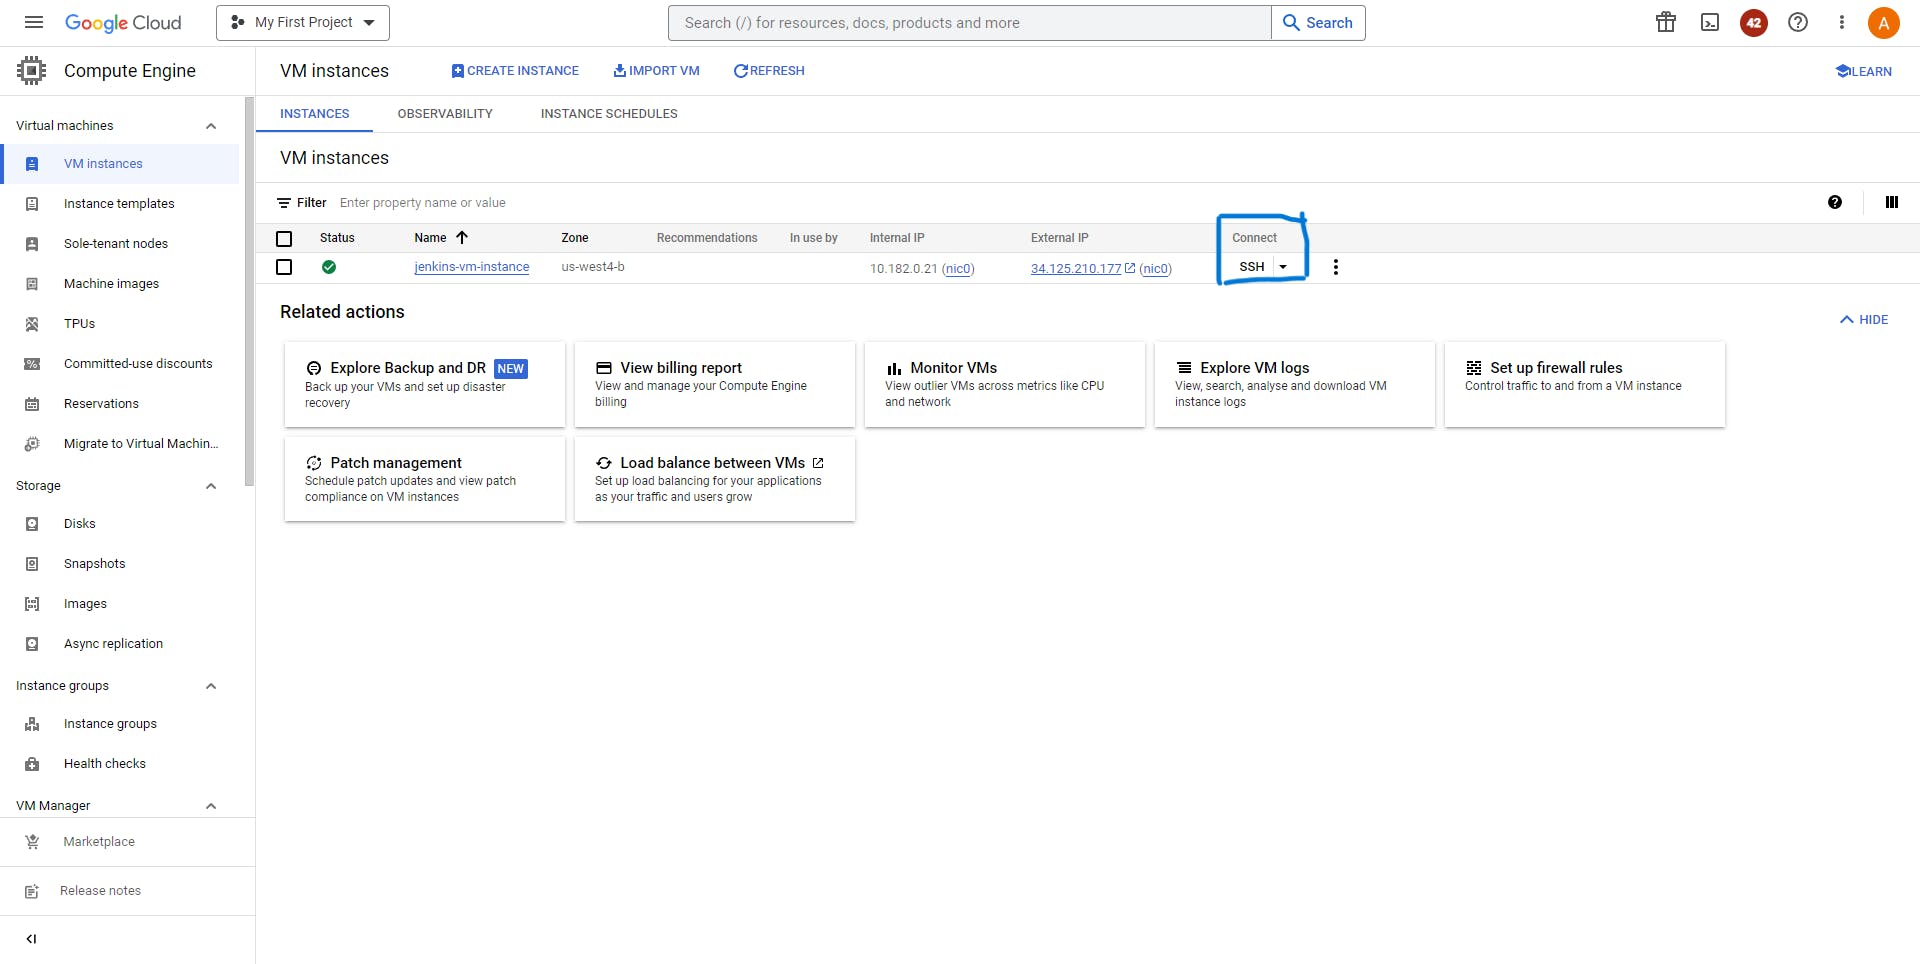
To open the terminal of your VM instance, click on the ssh, it will make a remote terminal in your browser window.
Jenkins can be installed by following commands:
  curl -fsSL https://pkg.jenkins.io/debian/jenkins.io-2023.key | sudo tee \
    /usr/share/keyrings/jenkins-keyring.asc > /dev/null
  echo deb [signed-by=/usr/share/keyrings/jenkins-keyring.asc] \
    https://pkg.jenkins.io/debian binary/ | sudo tee \
    /etc/apt/sources.list.d/jenkins.list > /dev/null
  sudo apt-get update
  sudo apt-get install jenkins
Installation of Java
  sudo apt update

  sudo apt install openjdk-17-jre -y

  java -version
Installation of Maven
  wget https://mirrors.estointernet.in/apache/maven/maven-3/3.6.3/binaries/apache-maven-3.6.3-bin.tar.gz
  tar -xvf apache-maven-3.6.3-bin.tar.gz
  sudo mv apache-maven-3.6.3 /opt/
  M2_HOME='/opt/apache-maven-3.6.3'
  PATH="$M2_HOME/bin:$PATH"
  export PATH
  mvn -version
Installation of Docker
  sudo apt-get update
  sudo apt-get install ca-certificates curl gnupg

  sudo install -m 0755 -d /etc/apt/keyrings
  curl -fsSL https://download.docker.com/linux/ubuntu/gpg | sudo gpg --dearmor -o /etc/apt/keyrings/docker.gpg
  sudo chmod a+r /etc/apt/keyrings/docker.gpg

  echo \
    "deb [arch="$(dpkg --print-architecture)" signed-by=/etc/apt/keyrings/docker.gpg] https://download.docker.com/linux/ubuntu \
    "$(. /etc/os-release && echo "$VERSION_CODENAME")" stable" | \
    sudo tee /etc/apt/sources.list.d/docker.list > /dev/null

  sudo apt-get update

  sudo apt-get install docker-ce docker-ce-cli containerd.io docker-buildx-plugin docker-compose-plugin -y

  sudo groupadd docker
  sudo usermod -aG docker $USER
  sudo chmod 666 /var/run/docker.sock
Setting environment for Jenkins:
After the installation of Jenkins, open another tab and enter the external IP address of your VM instance followed by port 8080. To get the temporary password to proceed, go on to the terminal and enter
sudo cat /var/lib/jenkins/secrets/initialAdminPassword
Go ahead with "install the suggested plugins". Enter all the details in the next step and continue.
Next up in the process, You get an account for the docker hub and get back again in this process. Then on the Jenkins dashboard go into Manage Jenkins > Credentials > System > Global Credentials (unrestricted) > Add Credentials. For the kind select Username with password. Enter the username of the docker hub, For the password it is preferred that you generate the token from docker-hub for security purposes, and then enter that token in the password section. Next in the id section enter 'dockerhub'. Then click on Create.
Similarly, generate the Credentials for GitHub as well. (Use id as 'github')
Setting up the environment for coding:
In this Section, we will configure the Visual Studio code directly with GitHub to commit the changes and send the file over to the repository. Open the VS code, and create a new folder. Click on the version control and configure the GitHub and git to your remote repository that you have created initially.

VS code now must have these two files, configured with GitHub to make commits and sync changes into the repo.
Creating Jenkins Pipeline
Get to the Jenkins dashboard and click Create a new job, then select the name of the pipeline and Choose the pipeline option. Head down toward the pipeline section from there select the pipeline script from SCM. and fill in the rest of the information according to your Repository. In the script path choose Jenkinsfie, hit apply, and then save.
- Now for writing the Jenkinsfile open your VS code and create a new file as 'Jenkinsfile' name it exactly like this because we have chosen the script path as 'Jenkinsfile'. The file will have the following code for now.
pipeline {
    agent any
    environment{
        DOCKERHUB_USERNAME = "amardeepgurjar"
        APP_NAME = "onlinebookstore"
        IMAGE_TAG = "${BUILD_NUMBER}"
        IMAGE_NAME = "${DOCKERHUB_USERNAME}" + "/" + "${APP_NAME}"
        REGISTRY_CREDS = 'dockerhub'
    }
    stages {
        stage('Clear Workspace'){
            steps{
                script{
                    cleanWs()
                }
            }
        }
        stage('git Checkout') {
            steps {
                script{
                    git credentialsId: 'github',
                    url: 'https://github.com/Developer-Atomic-Vishnu/Jenkins-ci-cd-java-pipeline.git',
                    branch: 'main'
                }
            }
        }
        stage('build package of application'){
            steps{
                withMaven (maven: 'maven-3'){
                      sh "mvn clean install"
                }
            }
        }
        stage('build docker image'){
            steps{
                script{
                    docker_image = docker.build "${IMAGE_NAME}"
                }
            }
        }
        stage('push docker image'){
            steps{
                script{
                    docker.withRegistry('',REGISTRY_CREDS){
                        docker_image.push("$BUILD_NUMBER")
                        docker_image.push('latest')
                    }
                }
            }
        }
        stage('deploying the image on vm'){
            steps{
                sh 'docker run -d -p 3000:8080 amardeepgurjar/onlinebookstore:latest'
            }
        }
    }
}
stage('Clear Workspace') will clear the old workspace if the Jenkins pipeline is built multiple times. It will remove the excess load from the VM instance. More on this can be learned from Clear Workspace.
Next on the code is the git Checkout stage which is essentially the stage to put out all the code from GitHub to the workspace. It will clone the repo.
Next on the code is building the package of Java application, which creates a Java application with (.war) extension. Inside the steps 'sh' means that after sh everything will run a bash command that you run normally in a Linux terminal. Also, it is necessary to add the plugins and tools to run the commands. Move the Jenkins Dashboard and Manage Jenkins > Plugins > Available plugins > Search for Pipeline Maven Integration Plugin and install it. Next Manage Jenkins > tools > Maven Installation > name as 'maven-3' and version as 3.6.1 > apply > save
Now, take a break, and Let's write a Dockerfile:
FROM tomcat:9.0

COPY /target/onlinebookstore-0.0.1-SNAPSHOT.war /usr/local/tomcat/webapps/

EXPOSE 8080

ENTRYPOINT ["catalina.sh", "run"]
Our Java application will be running on top of Tomcat version 9. Tomcat is a server that hosts web applications so Tomcat will be our base image. Now it will copy the war file from the target folder to the webapps folder where the file must be sent to make it run when the image runs with Tomcat. Next, we will open port 8080 for the container which is the default for Tomcat to receive requests from the external world. At last start the Apache Tomcat as the entry point inside the container.
Let's configure the Dockerfile in Jenkinsfile, To do that we have the next stage waiting to create a docker image out of Dockerfile. Also, we have to download some plugins to run these commands, to do that open the Jenkins dashboard and proceed to Manage Jenkins > Plugins > Available plugins > Search for Docker and select the Docker and Docker pipeline > install.
Next on the list is pushing the docker image over the DockerHub account which will store all the versions of the docker image that will be created.
Finally, we will deploy our application on the VM instance with the help of the docker image and when we will run the docker image we will get the Docker container out of it. For accessing the application we will open the port at 3000 and for testing purposes. We can get the application at the IP Address:3000/onlinebookstore-0.0.1-SNAPSHOT
In place of IP Address add the IP of your VM.
Ending of the Pipeline and this Article
We have successfully deployed the Java web application. If you found some error in the above article feel free to add some comments. I am new to Article writing some suggestions will help me to improve myself.
Version: 1.0
Thank you for reading this Article.